Hey there tech enthusiasts! If you're diving into the world of Raspberry Pi and cloud networking, you've landed in the right spot. Today, we're going deep into Raspberry Pi VPC network tutorial, a topic that's gaining serious traction among hobbyists and professionals alike. Whether you're looking to set up a private cloud at home or exploring scalable network solutions, this guide has got you covered.
Picture this: You're sitting in your living room, surrounded by Raspberry Pi boards, cables, and a dream of creating a fully functional private cloud. It might sound like a mission impossible, but with the right steps, it's absolutely doable. Setting up a Virtual Private Cloud (VPC) network using Raspberry Pi isn't just about tech wizardry; it's about empowering yourself with skills that could revolutionize how you handle data and networking.
This tutorial isn't just another tech article. It's a comprehensive, step-by-step guide designed to take you from zero to hero in the world of Raspberry Pi VPC network setup. Whether you're a complete beginner or an advanced user looking to refine your skills, this guide will provide the clarity and insights you need. Let's get started!
Read also:Josh Brin Mom A Fascinating Dive Into The Life And Influence
Table of Contents
- Introduction to Raspberry Pi VPC Network
- Understanding Raspberry Pi Basics
- What is a VPC Network?
- Step-by-Step Setup Process
- Hardware Requirements
- Software Requirements
- Configuring the Network
- Security Best Practices
- Troubleshooting Common Issues
- Future Considerations and Scaling
Introduction to Raspberry Pi VPC Network
Let's kick things off by breaking down what Raspberry Pi VPC network setup really means. A VPC, or Virtual Private Cloud, is essentially a private network environment that you can create within a public cloud infrastructure. When you combine this concept with the versatility of a Raspberry Pi, you get a powerful, cost-effective solution for managing your data and applications in a secure, isolated space.
This tutorial will walk you through every step of the process, from understanding the basics of Raspberry Pi to configuring your VPC network. By the end of this guide, you'll have a solid understanding of how to set up and manage your own private cloud environment using Raspberry Pi. So, grab your gear and let's dive in!
Understanding Raspberry Pi Basics
What is Raspberry Pi?
Raspberry Pi is a single-board computer that has become a favorite among tech enthusiasts and educators worldwide. It's compact, affordable, and incredibly versatile, making it perfect for a wide range of projects, from home automation to complex cloud setups.
Why Choose Raspberry Pi for VPC?
Here are some reasons why Raspberry Pi is an excellent choice for setting up a VPC network:
- Cost-Effective: Raspberry Pi is significantly cheaper than traditional servers, making it an attractive option for budget-conscious individuals and small businesses.
- Energy Efficient: It consumes less power compared to full-sized servers, which is great for the environment and your electricity bill.
- Highly Customizable: With its vast community and endless possibilities, you can tailor your Raspberry Pi setup to meet your specific needs.
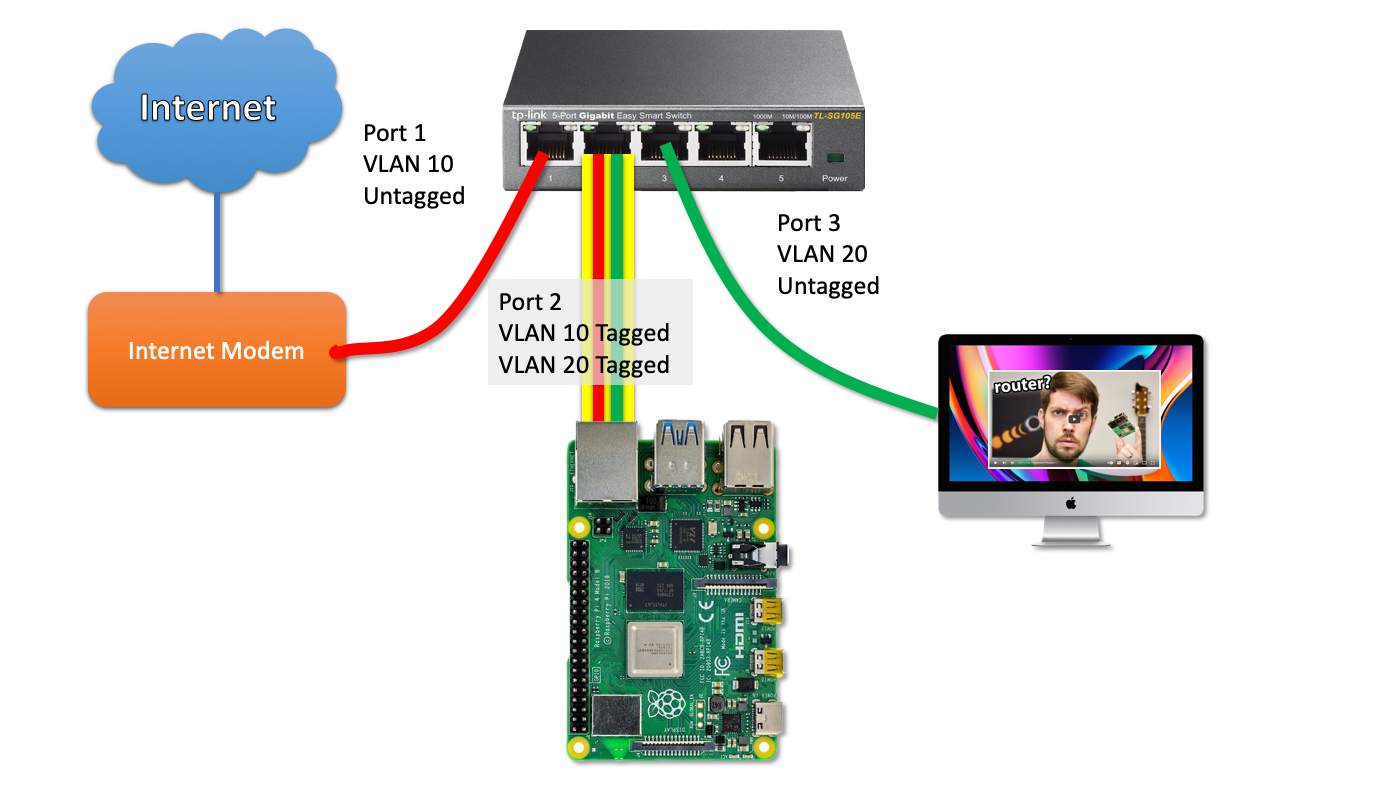
What is a VPC Network?
A VPC network is a virtual network dedicated to your AWS environment, logically isolated from other networks in the cloud. It enables you to launch AWS resources into a virtual network that you've defined, giving you complete control over your network configuration.
Read also:Elon Musk Wives The Untold Story Of Love Fame And Ambition
When you use Raspberry Pi to set up a VPC network, you're essentially creating a private cloud environment where you can host applications, store data, and manage resources securely. This setup is ideal for anyone looking to experiment with cloud technologies without the overhead of a full-scale cloud service provider.
Step-by-Step Setup Process
Step 1: Gather Your Materials
Before you start, make sure you have all the necessary components:
- Raspberry Pi board
- MicroSD card with Raspberry Pi OS installed
- Power supply
- Ethernet cables
- Router or switch
Step 2: Install Raspberry Pi OS
Install the latest version of Raspberry Pi OS on your microSD card. This will serve as the operating system for your Raspberry Pi. You can download the OS and use tools like Etcher to flash it onto the card.
Step 3: Configure Network Settings
Once your Raspberry Pi is up and running, configure your network settings to ensure it's properly connected to your local network. This step is crucial for setting up the VPC network.
Hardware Requirements
Here's a quick rundown of the hardware you'll need:
- Raspberry Pi 4 or newer
- MicroSD card (16GB or higher)
- Power adapter compatible with Raspberry Pi
- Ethernet cables for wired connection
- Optional: USB drives for additional storage
Software Requirements
Software-wise, you'll need the following:
- Raspberry Pi OS
- A VPC management tool or software (e.g., Terraform or AWS CLI)
- SSH client for remote access
Configuring the Network
Setting Up Static IP
To ensure consistent network communication, set up a static IP address for your Raspberry Pi. This makes it easier to manage and access your device within the network.
Configuring DNS and DHCP
Configure DNS and DHCP settings to streamline network connectivity. This step ensures that your Raspberry Pi can communicate with other devices on the network without issues.
Security Best Practices
Security is paramount when setting up a VPC network. Here are some best practices to keep your setup secure:
- Use strong passwords and enable SSH keys for authentication.
- Regularly update your Raspberry Pi OS and installed software.
- Implement firewalls to control incoming and outgoing traffic.
Troubleshooting Common Issues
Even with the best planning, issues can arise. Here are some common problems and their solutions:
- Connection Issues: Check your Ethernet cables and ensure your router is functioning properly.
- SSH Access Problems: Verify that SSH is enabled in your Raspberry Pi settings.
- Software Errors: Reinstall or update problematic software components.
Future Considerations and Scaling
As you grow more comfortable with your Raspberry Pi VPC network, consider scaling your setup. You can add more Raspberry Pi units, increase storage capacity, or even integrate additional services like a web server or database management system.
Remember, the possibilities are endless with Raspberry Pi. Keep experimenting, learning, and pushing the boundaries of what you can achieve with this incredible device.
Conclusion
And there you have it, folks! A comprehensive Raspberry Pi VPC network tutorial designed to take your tech skills to the next level. From understanding the basics to configuring your network and implementing security best practices, this guide has covered it all.
Now it's your turn to take action. Share your thoughts, ask questions, or let us know how your Raspberry Pi VPC setup is going in the comments below. And don't forget to check out our other tutorials for more tech insights and tips.
Happy tinkering, and see you on the next tech adventure!